Putting in my {FIRST} counter tops, sink, faucet and disposal!
Our basement kitchenette progress has been chugging proper alongside! I’ve labored
on this room nonstop since late final fall, and I am thrilled with the way it has
come collectively!
For months I went by way of all of the countertop choices, and we waffled between
onerous floor counters and one thing cheaper like laminate.
Granite or quartz would have been beautiful, however sheesh…I had forgotten how
costly they’re. Plus I used to be feeling impatient, and knew it could take a
few weeks to make that occur.
Laminate is available in so many nice coloration choices now, however I choose to not have
the brief, rounded backsplash that the majority of them include. (There are
choices with out that now although!)
However after I thought in regards to the moody, cozy feeling I wished for this house, I
knew my good ole go-to wooden butcher block was what I wished:

This submit might include affiliate hyperlinks for
your comfort.
I could earn a small fee when you make a purchase order by way of hyperlinks.
Putting in the butcher block counter tops.
birch butcher block counters
and had them delivered to our home. I texted the contractor guys we use for
some bigger initiatives to see about assist with the set up, however they have been
booked up for weeks.
I used to be dying to get this little kitchen functioning with a sink, so I made a decision
to deal with them by myself. I used my round noticed to chop every bit right down to
dimension, after which we carried them down so I might set them in place.
pre stain wood conditioner, stained them with my favourite Provincial stain (additionally Minwax) after which
utilized one coat of Tung oil.
ultimate coat:

The wooden counters turned out so stunning! We LOVE the heat of the
butcher block together with the sunshine grey cupboards:

Once I was certain they have been prepared and in place, I connected the counter tops
from beneath with screws. The highest brackets on the cupboards have a gap
for the screws, so it makes the whole lot tremendous safe.
Be sure your screws are lengthy sufficient to enter your counter, however not too
lengthy they’re going to come by way of the highest!
I’ve minimize down and put in smaller sections of countertop many instances, however
by no means this many and at this dimension. This was a HUGE job, but it surely went faster
than I believed it could.
Putting in the sink and tap.
YAY! The counter tops have been minimize, handled and put in. It was lastly time to
get the sink and tap in!
But once more, my impatience fuels my willpower. I did a TON of
analysis on the best way to minimize counters and set up a sink, in addition to putting in a
faucet and disposal…none of which I’ve ever tried.
We have had black quartz kitchen sinks for the almost ten years now, and I
completely love them. I like the contact of black and that they’re really easy to
preserve clear.

I laid the sink face down on the counters and made certain there was two inches
of house throughout the entrance:

Then traced the sink onto the butcher block.
However I needed to retrace after I remembered that I wished to make use of painter’s tape
to chop down on any splintering as I used to be reducing. 🙂
After laying down the tape, I used a bigger bit on the corners after which my
jigsaw to chop the sink form out:

That is essential — ensure that to safe a pair scrap items of wooden
throughout the half you are eradicating so it does not crash right down to the ground as you
minimize. It is heavy!:

After cleansing up, we checked to ensure the sink match, then utilized a bead
of silicon across the lip of the sink and dropped it into the
countertop.
If in any respect potential, minimize the outlet in your sink outdoors or in a storage!
It is MESSY!
I used to be on a roll! It was time to try one other first…putting in a faucet
from scratch.
I say from scratch as a result of this spot was solely roughed in once we constructed our
house, so the cold and warm shut off valves and plumbing pipes weren’t
put in:

Be sure to flip off the water in your house earlier than reducing the ends off
of these tubes or doing any plumbing!
We wished a rubbish disposal down right here as nicely, so went by way of the identical
technique of researching the how-to.
There was plenty of pausing and taking part in on these movies as I went by way of
each processes. However they labored and NOTHING leaked!
Over a pair weeks I put in the counter tops, sink, plumbing, faucet and
disposal all on my own! There aren’t many DIY initiatives I have never tried,
however the plumbing was intimidating. Now that I’ve carried out all of this, altering
out a faucet will likely be straightforward. 🙂
Lastly, the kitchenette was beginning to come collectively. I have been dreaming
of getting this house for years!
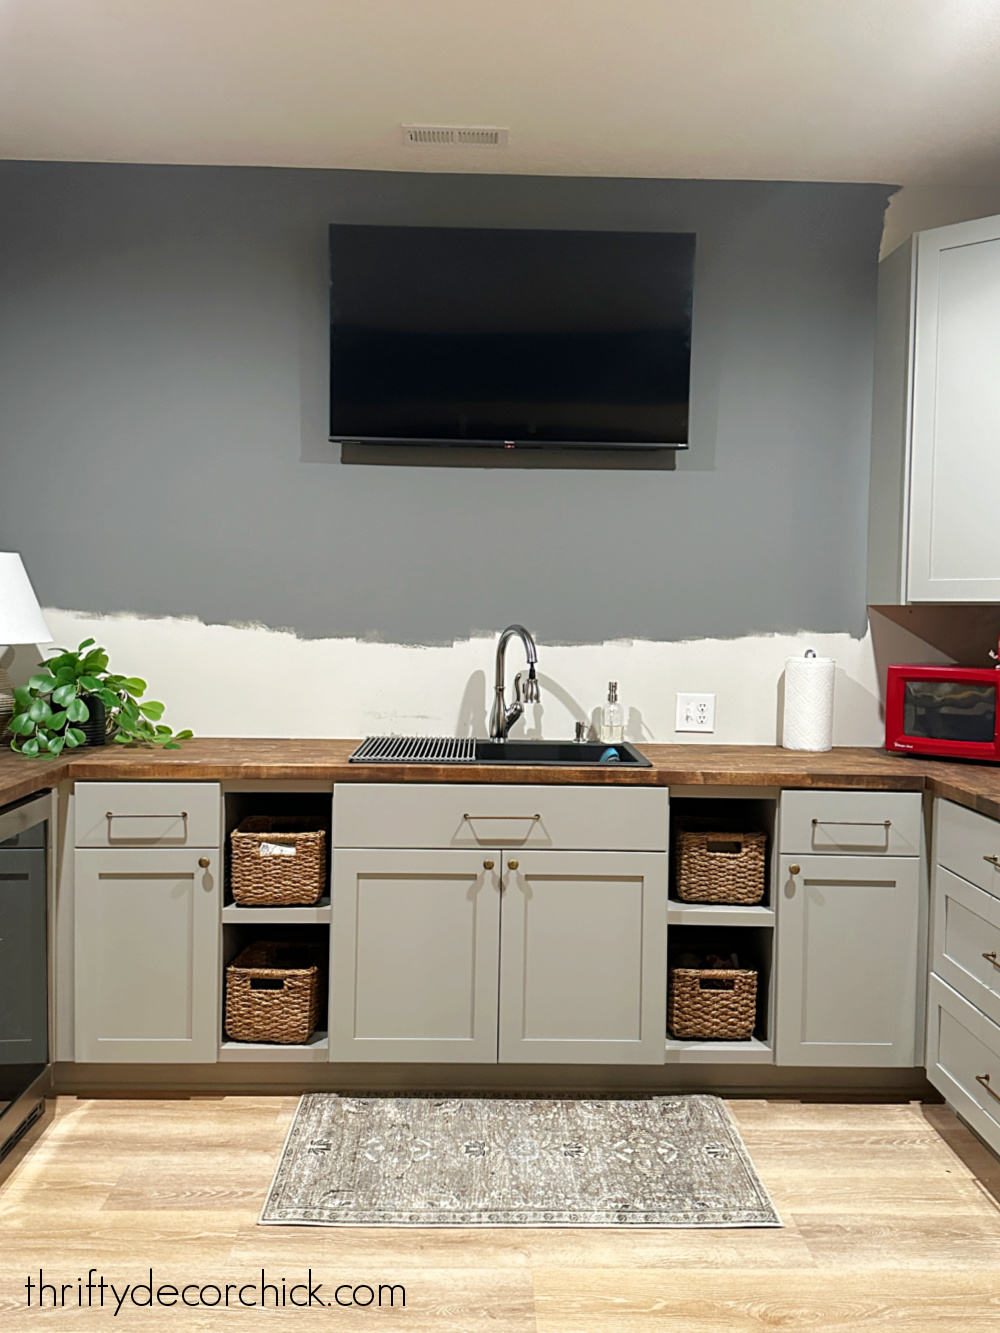
Here is the way it seemed earlier than I began on the backsplash:
I solely painted the wall right down to the place the tile was going. (The colour is
Westchester Grey, identical as the remainder of the basement.)
Subsequent up, time to begin the enjoyable stuff! I am unable to wait to indicate you ways this
house seems now.
My purpose is to make the TV mix into the wall slightly bit. (I would not have
picked one in right here, however my household insisted and now I actually do prefer it.) And
additionally even out the load of the room: